VIDEO: A Simple 3D Interactive Renderer with a GUI.
A simple example using Qt, VTK and Python.
I've worked on many projects over the years that have involved some sort of data visualisation. Commonly, due to the nature of materials modelling this visualisation was in 3D and required a level of user interaction. There are lots of options in various programming languages that you can use to produce an interactive 3D rendering app, the one I will go through in this post is the Visualisation Toolkit (VTK) combined with the Qt GUI framework. Well more precisely, I'll be using the Python wrappers for both VTK and Qt.
VTK and QT
VTK is an open-source set of libraries for 3D graphics and visualisation developed by KitWare. The code is written in C++ but comes with an interface to Python.
Qt is a cross-platform GUI tookit current developed by Digia, again written in C++. Originally Qt was produced by Trolltech who were bought by Nokia, who after the fall of the Symbian OS, sold the licensing to Digia. This isn't the main source of confusion however; there are two flavours of Python wrappers:
- PyQt4 - developed by Riverbank Computing - license: GPL, commercial
- PySide - developed by Nokia - license: LGPL
As is maybe clear from the above, the main difference is licensing. In fact PySide was born out of the lack of a LGPL license for PyQt4. The 'L' that separates LGPL from GPL is a big deal - it allows developers to use PySide in any code without being forced to the release the source (as in the GPL). Anyway, let's not get into licensing.
A simple PySide/VTK renderer
The example below will work towards the simple app shown in this video:
The main object used in the example is QVTKRenderWindowInteractor.py. This provides a QT widget that contains a VTK render window. This widget can then be embedded into a GUI in a typical Qt fashion.
For the below example we create two classes;
VtkQtFrame(QtGui.QWidget)- Holds the QVTKRenderWindowInteractor and VTK rendering handlesSphereActor(vtkActor)- A simple vtk object to cleanly create a sphere
Firstly let's take a look at VtkQtFrame:
class VtkQtFrame(QtGui.QWidget):
    def __init__(self):
        QtGui.QWidget.__init__(self)
        self.layout = QtGui.QVBoxLayout(self)
        self.layout.setContentsMargins(0, 0, 0, 0)
        self.setLayout(self.layout)

        self.setSizePolicy(QtGui.QSizePolicy.Preferred, QtGui.QSizePolicy.Preferred)

        self.VTKRenderer = vtkRenderer()
        self.VTKRenderer.SetBackground(1, 1, 1)
        self.VTKRenderer.SetViewport( 0, 0, 1, 1)

        self.VTKRenderWindow = vtkRenderWindow()
        self.VTKRenderWindow.AddRenderer(self.VTKRenderer)
        self.VTKRenderWindowInteractor = QVTKRenderWindowInteractor(self,rw=self.VTKRenderWindow)
        self.layout.addWidget(self.VTKRenderWindowInteractor)

        self.VTKCamera = vtkCamera()
        self.VTKCamera.SetClippingRange(0.1,1000)
        self.VTKRenderer.SetActiveCamera(self.VTKCamera)

        self.VTKInteractorStyleSwitch = vtkInteractorStyleSwitch()
        self.VTKInteractorStyleSwitch.SetCurrentStyleToTrackballCamera()
        self.VTKRenderWindowInteractor.SetInteractorStyle(self.VTKInteractorStyleSwitch)
        self.VTKRenderWindowInteractor.Initialize()
        self.VTKRenderWindowInteractor.Start()
        self.VTKRenderWindowInteractor.ReInitialize()
The code above is fairly self explanatory. We subclass QtWidget, create a layout and add the QVTKRenderWindowInteractor. We explicitly create a VTKRenderer, VTKRenderWindow and VTKCamera. We also create a VTKInteractorStyleSwitch to change the default VTK interaction style.
The naming convention headache - In Python, the standard is to use
snake_case(lowercase words separated by underscores) for functions and class methods. I did think this was the case for C/C++ too but it seems that the Qt and VTK libraries are different. In fact the VTK library usesCamelCasefor all its methods/classes whilst the Qt library useslowerCamelCasefor it's class methods. This becomes messy when subclassing a native Qt or VTK object - or even worse when you use QVTKRenderWindowInteractor. My advice would be to stick tosnake_caseand try not to slip into another format - good luck!
Now for SphereActor:
class SphereActor(vtkActor):
    def __init__(self,rad,res,r,c):
        self.pos = numpy.array(r)
        self.source = vtkSphereSource()
        self.source.SetRadius(rad)
        self.source.SetPhiResolution(res)
        self.source.SetThetaResolution(res)
        self.source.SetCenter(r[0],r[1],r[2])
        self.Mapper = vtkPolyDataMapper()
        self.Mapper.SetInput(self.source.GetOutput())
        self.SetMapper(self.Mapper)
        self.GetProperty().SetColor((c[0],c[1],c[2]))
    def move_to(self,r):
        self.pos = numpy.array(r)
        self.source.SetCenter(r[0],r[1],r[2])
    def set_color(self,color):
        self.GetProperty().SetColor(color)
    def set_rad(self,rad):
        self.source.SetRadius(rad)
    def get_pos(self):
        return self.pos
Again, fairly trivial. We subclass vtkActor so our new object can be added to the vtkRenderer easily. We then set the properties of the sphere; position, colour and radius. In addition we set the resolution which controls the number of triangles used to mesh the sphere - the higher this number the more computationally expensive. There are also methods specific to VTK which have been inherited from vtkActor such as SetMapper. The Mapper (in this example) takes the input from the SphereSource and passes polygon data to the vtkActor. The SphereSource can simply be seen as provided the mesh of a sphere. This saves us from having to define the position of each triangle that makes up the sphere.
Now we have our two classes, we can look at our main routine:
def main():
    app = QtGui.QApplication(sys.argv)

    #create our new Qt MainWindow
    window = QtGui.QMainWindow()

    #create our new custom VTK Qt widget
    render_widget = VtkQtFrame()

    for i in range(0,10):
        # random 3D position between 0,10
        r = numpy.random.rand(3)*10.0
        # random RGB color between 0,1
        c = numpy.random.rand(3)
        # create new sphere actor
        my_sphere = SphereActor(1.0,20,r,c)
        # add to renderer
        render_widget.VTKRenderer.AddActor(my_sphere)

    # reset the camera and set anti-aliasing to 2x
    render_widget.VTKRenderer.ResetCamera()
    render_widget.VTKRenderWindow.SetAAFrames(2)

    # add and show
    window.setCentralWidget(render_widget)
    window.show()

    # start the event loop
    try:
        sys.exit(app.exec_())
    except SystemExit as e:
        if e.code != 0:
            raise()
        os._exit(0)

if __name__ == '__main__':
    main()
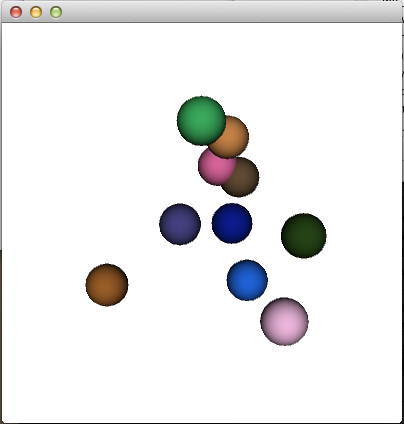
In the above routine we create 10 randomly placed spheres of radius 1 that have a random RGB colour. After we have added our spheres, we call ResetCamera() which recenters the camera on the current actors. We also increase the anti-aliasing to make the spheres appear smoother. Increasing the AA any higher can become very demanding on your system and cause a laggy motion when interacting with the scene (this will be familiar to PC gamers...). After running the above code you should be presented with a 3D rendered scene within a Qt MainWindow that contains the randomly placed spheres:

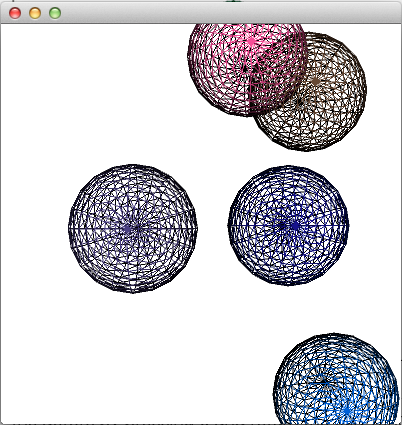
You should be able to spin the camera, zoom and pan. You can also show a wireframe model of the actors by pressing W (see below) and return the fully rendered scene with a press of the S key.

W to view the underlying mesh. To return to the normal view press S.
Comments